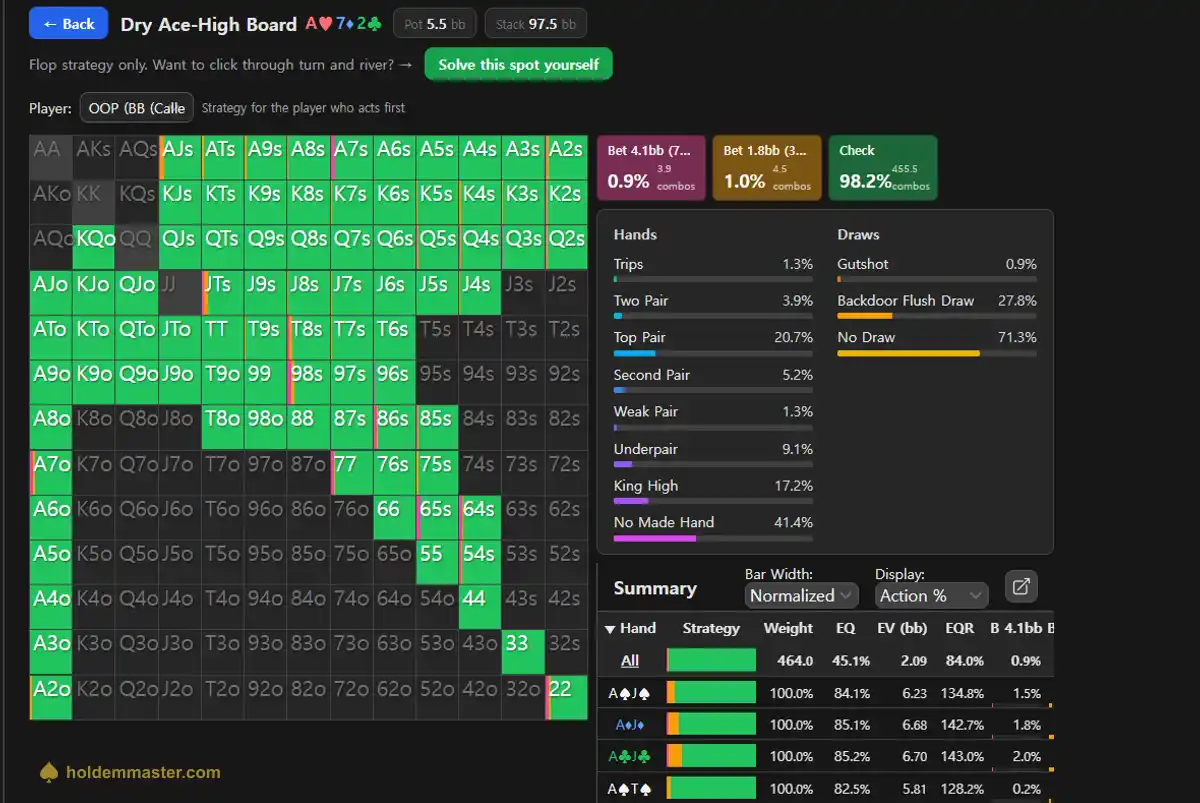
The flop comes A♥ 7♦ 2♣, rainbow. You are in the big blind with A9 — top pair. Leading out feels obvious. It isn't.
Every figure below came from HoldemMaster's free GTO solver, read off the study-spot output on 2026-08-19, and you can pull the same screen up with a single click.
✦ Quick answer
Check, and plan to keep going. When a range takes one action with practically everything — strong hands included (the bets across both sizes add up to just 1.9%) — that is a range check, and it is what the big blind does here. Checking is not giving up on the pot: it keeps the button's bluffs in, and top pair is still a hand you continue with when the c-bet lands.
What conditions produced these numbers?
The button opens to 2.5bb, the big blind calls, and everyone else folds — so two players see a 5.5bb pot with 97.5bb behind. Both ranges are the standard 100bb online approximations, the flop is A♥ 7♦ 2♣ rainbow, and the solver is given two bet sizes to work with, roughly a third and three-quarters of the pot. Rake is not modeled. Change any of those and the frequencies change with them.
| Setting | Value |
|---|---|
| Preflop | BTN opens 2.5bb · BB calls · everyone else folds |
| Ranges | Approximations of standard 100bb online play |
| Flop | A♥ 7♦ 2♣, rainbow |
| Pot · stack | Pot 5.5bb · effective stack 97.5bb |
| Bet sizes | Roughly 33% and 75% of pot |
| Rake | Not modeled |
| Checked | 2026-08-19, study spot output |
What's a good c-bet percentage on a dry ace-high board?
It depends entirely on which seat you are in. For the preflop raiser on a board this dry, roughly 70–100% at a small size heads-up in position — the  continuation bet guide breaks that down by board type. For the player who called, the answer is essentially zero.
Strictly, the caller does not have a c-bet at all — the term means the preflop raiser betting the flop, so the big blind's version is a lead. But it is the number people want when they land on this side of the hand, and here it is:
| Big blind's first action | Frequency | Combos |
|---|---|---|
| Check | 98.2% | 455.5 |
| Bet 1.8bb (33% pot) | 1.0% | 4.5 |
| Bet 4.1bb (75% pot) | 0.9% | 3.9 |
Why does the big blind check top pair too?
Because the pot is easier to win by checking than by betting into it. Leading with one pair, out of position, against the player who took the initiative preflop is the expensive way to play a hand you are happy to see showdown with.
Three things are working against a lead. First, equity realization: the numbers below show the big blind banking 84.0% of its equity and the button 113.1%. Building a bigger pot out of position makes that gap cost more, not less. Second, the button typically c-bets a flop like this often (a frequency this solve does not provide) — checking keeps its bluffs in the pot, while leading lets them fold and take nothing. Third, the big blind's range is capped: with no AA, AK or AQ in it, a lead invites raises from strong aces, and most of the big blind's range cannot continue against them — only 24 combos can stand a raise (the sets 77 and 22, the two pair A7 and A2). (No raise node is solved here.)
What a lead does not do is fold out better hands. The button's opening range keeps every ace down to A2, plus underpairs and sevens, so plenty of worse hands would call — that is not the problem. The problem is the pot you are building to win it.
It also matters that "an ace" is not one hand type. A9 loses kicker battles to AK, AQ, AJ and AT, while A7 and A2 are not top pair at all — on this board A7 plays as A-A-7-7-2, two pair. A range check hides all of them behind one action, so your opponent cannot sort them.
And the hands that do bet are not the ones you would guess. Open the detail table and the strongest aces the big blind is allowed to have take the occasional stab: A♣J♣ bets the small size 14.5% of the time, A♦J♦ 12.2%, A♠J♠ 7.1%, A♠T♠ 4.5%. Small frequencies, but they come from the top of the range rather than from air — which is why the check is not a pure surrender.
What is a dry board, and why does this one favor the raiser?
A dry board is one with no flush draw and almost no straight draw — three unconnected cards in three different suits, like A♥ 7♦ 2♣. Almost nothing is chasing anything: 71.3% of the big blind's range has no draw, and most of the rest is a backdoor flush draw. It favors the raiser because the button's opening range keeps AK and AQ while the big blind's calling range tops out at AJ — the aces are stacked on one side, and there are no draws to even out later.
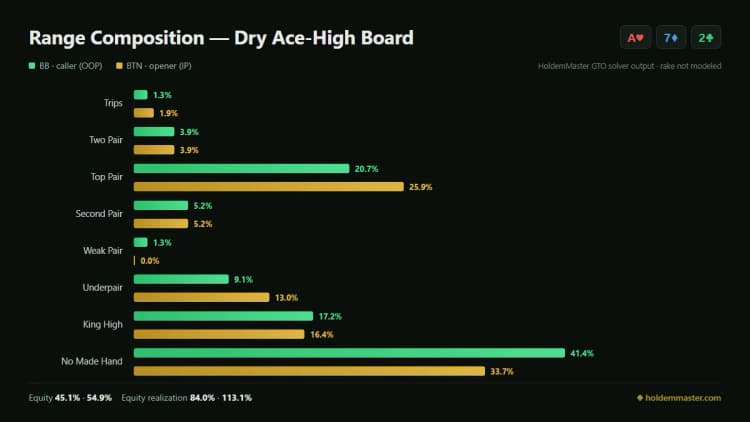
Out of position (OOP) is the big blind, acting first; in position (IP) is the button.
| Category | BB (OOP) | BTN (IP) |
|---|---|---|
| Trips — here always a set | 1.3% | 1.9% |
| Two pair | 3.9% | 3.9% |
| Top pair | 20.7% | 25.9% |
| Second pair | 5.2% | 5.2% |
| Weak pair | 1.3% | 0.0% |
| Underpair | 9.1% | 13.0% |
| King high | 17.2% | 16.4% |
| No made hand | 41.4% | 33.7% |
Sets tell the same story by hand count. The pocket pairs that flop a set here are AA, 77 and 22, and the big blind has only 77 and 22 — three combos each, six of 464, which is the 1.3% on screen. The button keeps all three pairs: nine combos, 1.9%. The arithmetic matches the solver exactly.
What does range advantage mean if equity is nearly even?
Range advantage means one player's whole range fits the board better than the other's. On A♥ 7♦ 2♣ it barely shows up in raw equity — 45.1% against 54.9%, a 9.8 point gap that no one would call a disaster. It shows up in what each side is able to bank from that equity, and there the two seats are not close.
| Metric | BB (OOP) | BTN (IP) |
|---|---|---|
| Equity | 45.1% | 54.9% |
| EV (bb) | 2.09 | 3.41 |
| Equity realization (EQR) | 84.0% | 113.1% |
Position and range advantage compound here: the button gets the bigger slice and the better rate of converting it. The general principle is in the equity guide, and why the seat itself is worth so much is covered in  playing position.
When should the button c-bet a dry ace-high flop?
Almost always, small — against opponents who fold. The big blind has 41.4% no made hand and 71.3% with no draw, so folds come easily and the hands that stay rarely improve. That is the textbook case for the small size, which is why the 33% bet (1.8bb) is the one to reach for here.
Against a table that calls anything, "bet everything small" stops being free: nothing folds, and you are building pots with hands that do not want one. There the adjustment is fewer stabs and more value.
The rule of thumb generalizes with one condition: the side with the range advantage — and no clear nut advantage — bets small and often. On boards where one player also owns the nuts, sizing goes up instead. How that changes across board types is in continuation bet strategy.
What changes at the table?
- •Having called a raise heads-up, drop the idea of leading a dry ace-high flop. Top pair included. Leading builds a pot you then have to play out of position with one pair — which is exactly the 84% against 113% gap above. (Limped pots and blind-versus-blind are a different structure and are not what this spot covers.)
- •Checking is not check-folding. This is where the number gets misread. Facing the button's small c-bet, the big blind continues very wide — every ace, most sevens, the underpairs, king-high with a backdoor. A9 is a check-call, usually through the turn as well. The natural check-raise candidates are 77, 22, A7 and A2, plus a few backdoor bluffs — though this solve does not cover the big blind's response to the c-bet.
- •On the button, bet small and wide against opponents who fold. Against a player who never folds, adjust in two directions: fewer bluffs, because they will not fold no matter what you bet — especially on the turn and river, where second and third barrels are pure loss — and bigger value bets with top pair or better. A9 with its weak kicker is not a size-up hand; it is a hand you simply do not fire three times.
- •Against a balanced opponent, a check here is not weakness — the checking range contains sets (77, 22) and two pair (A7, A2), so pushing too hard runs into a check-raise. At low stakes it is often the reverse: many players simply lead their strong hands, so their check really is weak. Keep value-betting; treat the check-raise as an occasional cost, not a reason to slow down.

Check it yourself
Open the free GTO solver, go to Study Spots → Dry Ace-High Board → [⚡ View results], and this exact screen appears with no waiting. Switch the player selector between OOP and IP to compare both ranges, and sort the detail table by any column to find the hands that bet. The study spots pre-solve the flop's first action only — to click through turn and river, or to change a range and watch the frequencies move, use Solve this spot yourself and run the tree.
To drill the same spot instead of reading it, open the GTO Trainer in the sidebar: it deals you a hand from the real range, you pick an action, and it tells you what that choice cost in big blinds. It is free, with nothing to install and no account.
Review your own hand from this spot — This spot is a BTN open, BB call pot. If you have played the same situation, open the solver's Hand review ↗, set the situation (Open · Call, BTN and BB) and Your seat, pick Your 2 cards and the 3 flop cards, then enter the actions in the order they were actually played, including your opponent's. Hand review then shows whether that choice is rated Best play, Acceptable or Review this play. Hand review uses the app's preflop charts (online 6-max cash, 100bb), so its numbers can differ slightly from the example above, and it may not suit pub games or tournaments.