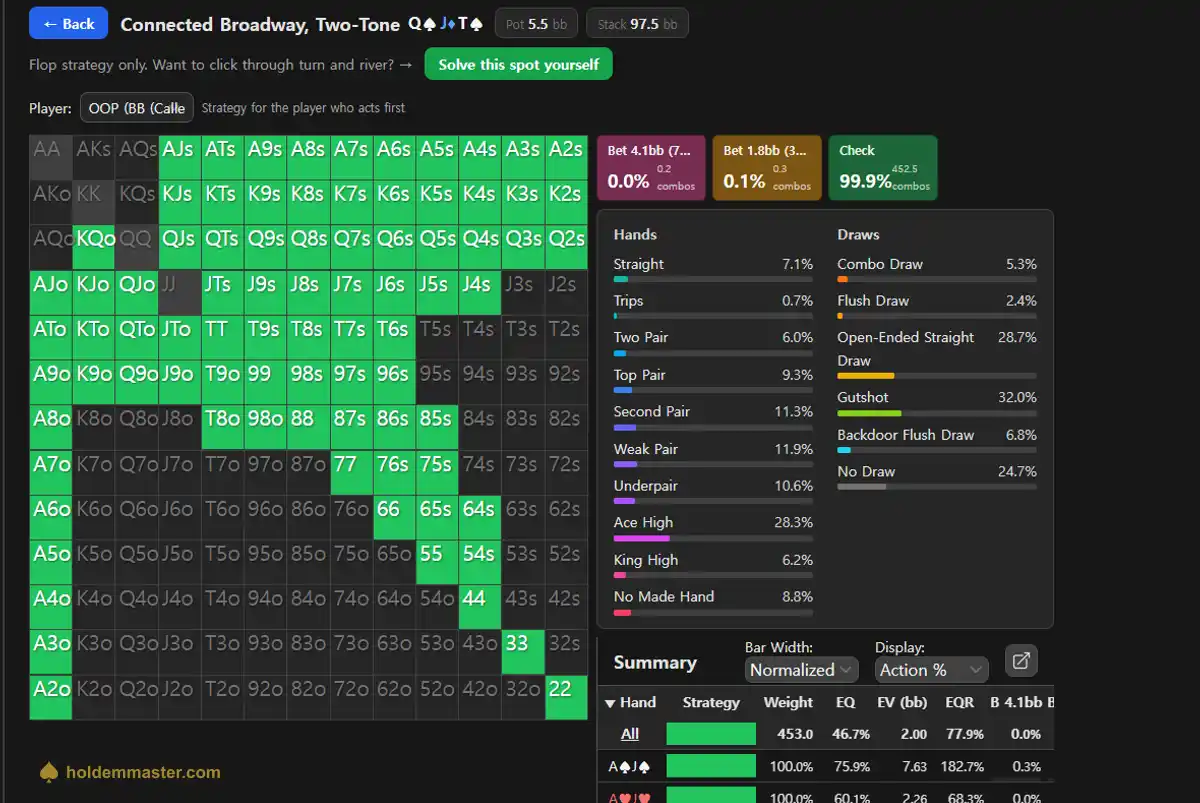
The flop comes Q♠ J♦ T♠. You hold KQ in the big blind — top pair plus an open-ended straight draw. Checking this has to be wrong, surely.
The last two spots — ace-high and  king-high — were quiet boards where almost nothing was drawing. This is the opposite: 68.4% of the big blind's range holds a draw here. And the solver still checks 99.9%. Leading got rarer, not more common.
"Lots of draws" and "you may bet first" are different claims. Every figure below came from HoldemMaster's free GTO solver, read off the study-spot output on 2026-08-19.
✦ Quick answer
The big blind checks 99.9% on Q♠J♦T♠, with 68.4% of its range holding a draw. The reason is nut advantage: straights 10.5% against 7.1%, sets 2.0% against 0.7%, overpairs 2.6% against 0%. The nutted categories sit with the button — two pair alone ties at 6.0% against 5.9% — so betting first folds out the hands you beat and gets called by the hands you don't.
What conditions produced these numbers?
Same structure as the rest of the series: the button opens to 2.5bb, the big blind calls, everyone else folds. Two players, a 5.5bb pot, 97.5bb behind, standard 100bb online ranges, and two bet sizes available at roughly a third and three-quarters of the pot. The only thing that changed is the flop.
| Setting | Value |
|---|---|
| Preflop | BTN opens 2.5bb · BB calls · everyone else folds |
| Ranges | Approximations of standard 100bb online play |
| Flop | Q♠ J♦ T♠, two-tone (two spades) |
| Pot · stack | Pot 5.5bb · effective stack 97.5bb |
| Bet sizes | Roughly 33% and 75% of pot |
| Rake | Not modeled |
| Checked | 2026-08-19, study spot output |
Why check 99.9% when the board is this wet?
Because the quality of the made hands decides the action, not the quantity of draws.
| Big blind's first action | Frequency | Combos |
|---|---|---|
| Check | 99.9% | 452.5 |
| Bet 1.8bb (33% pot) | 0.1% | 0.3 |
| Bet 4.1bb (75% pot) | 0.0% | 0.2 |
What is nut advantage on this flop?
It is who holds the top of the range. On Q-J-T the categories rank straight → set → two pair → overpair, and the button leads every one of them except two pair.
| Top category | BB (OOP) | BTN (IP) | What causes the gap |
|---|---|---|---|
| Straight | 7.1% | 10.5% | The big blind has no AK |
| Trips (set) | 0.7% | 2.0% | The big blind has no QQ, no JJ |
| Two pair | 6.0% | 5.9% | Effectively tied — the one row the big blind leads |
| Overpair | 0.0% | 2.6% | The big blind has no AA, no KK |
Every gap was created preflop. The big blind three-bets AA, KK, QQ, JJ and AK, so none of them arrive on the flop; the button opens all of them and brings them along.
The combinations match exactly. Only three hands make a straight here: AK (A-K-Q-J-T), K9 (K-Q-J-T-9) and 98 (Q-J-T-9-8). None of the cards they need — the ace, the king, the nine, the eight — is on the board, so each is 4 × 4 = 16 combos. The big blind holds K9 and 98 for 32 combos; the button adds AK for 48. The solver's 7.1% and 10.5% are 32.2 and 48.1 combos — the same numbers.
The entire difference is one hand: AK. A single preflop three-betting decision moves that much of the flop's nut share.
Range advantage vs nut advantage — what's the difference?
Range advantage is who is stronger on average; nut advantage is who holds more of the very best hands. They usually move together, and this flop is the case where they don't.
| Range advantage | Nut advantage | |
|---|---|---|
| Question it answers | Whose range has more equity overall? | Who holds the top hands? |
| On Q-J-T | Nearly even — 46.7% against 53.3% | Lopsided — straights, sets and overpairs all favor the button |
| What it drives | Whether you bet at all | How big you bet, and who can raise |
How much of each range is drawing?
Counting real draws only: 68.4% for the big blind, 68.7% for the button. Add backdoor flush draws and it reaches 75.2% and 74.4% — three-quarters of both ranges.
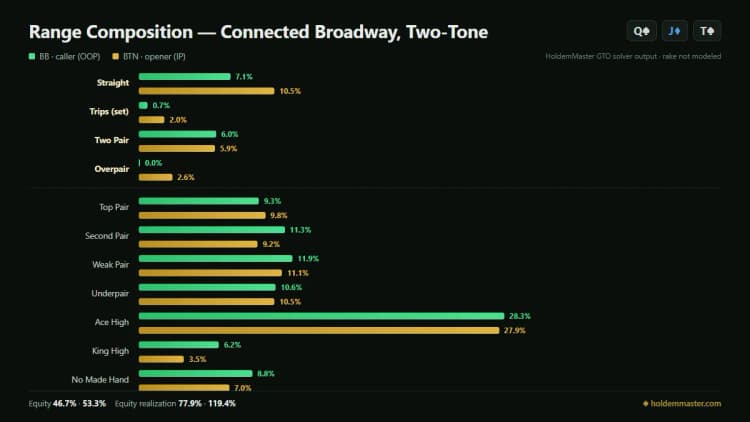
| Draw | BB (OOP) | BTN (IP) |
|---|---|---|
| Combo draw (straight + flush) | 5.3% | 4.1% |
| Flush draw | 2.4% | 2.0% |
| Open-ended straight draw | 28.7% | 27.7% |
| Gutshot | 32.0% | 34.9% |
| Backdoor flush | 6.8% | 5.7% |
| No draw | 24.7% | 25.5% |
So the fight on this board is not about who has more draws. Even draws cancel out, and what does not cancel is the nut advantage. If counting outs is the part you want to firm up, start with drawing odds.
Why is top pair dangerous here?
Because 21.0% of the button's range already beats it. That is straights 10.5% plus sets 2.0% plus two pair 5.9% plus overpairs 2.6%.
On the dry king-high flop, the same calculation came to 3.6% — sets 1.9%, two pair 0.4%, overpairs 1.3%.
| Share of the button's range that already beats top pair | |
|---|---|
| Dry king-high flop (K-8-3) | 3.6% |
| Broadway flop (Q-J-T) | 21.0% |
Why is EQR 78 against 119 when equity is 47 against 53?
Because the more decisions a board forces, the more the last-to-act seat is worth.
| Metric | BB (OOP) | BTN (IP) |
|---|---|---|
| Equity | 46.7% | 53.3% |
| EV (bb) | 2.00 | 3.50 |
| Equity realization (EQR) | 77.9% | 119.4% |
Line the three flops up and the trend is clean.
| Flop | BB EQR | BTN EQR | Gap |
|---|---|---|---|
| A-7-2 (dry) | 84.0% | 113.1% | 29.1 points |
| K-8-3 (dry) | 80.7% | 116.7% | 36.0 points |
| Q-J-T (connected, two-tone) | 77.9% | 119.4% | 41.5 points |
 9♥8♥7♣ is, like Q-J-T, three cards in a row on a two-tone board, and its gap is 13.2 points, the narrowest of the seven single-raised pots, with the big blind realizing 93.2%, the highest of those seven (across the series the 117.8% of the Q-T-7 three-bet pot is higher). What opens the gap is not busyness but whose range the top of the board belongs to: Q-J-T hands AK, QQ, JJ, AA and KK straight to the button, while on 9-8-7 those same cards miss the board. ⚠ Not that they are irrelevant there — 9-8-7 splits overpairs 1.3% against 6.4%, a wider gap than Q-J-T's 0% against 2.6%. But that overpair edge is a fragile one on a connected board, which is why it does not lock down the top. Why acting last is worth what it is:
  playing position.
How should the button bet a dynamic board like this?
Not small-only — the large size comes into the mix here. With the nut advantage, a large bet is hard to raise: the straights, sets and overpairs sit mostly on one side (the big blind holds just 7.1% straights and 0.7% sets), so the other player has little to push back with.
That is the opposite of the dry-board recipe. There, small and frequent worked because the goal was folding out air. Here, 68.4% of the opponent's range is drawing, so folds are expensive to buy — the small size alone cannot do the work, and the large one has to come along. ⚠ Do not push that as far as "so the frequency drops": this study spot solves the flop's first action only, so the button's actual sizing split and c-bet frequency are not in it. The board-by-board version is in  continuation bet strategy.
What changes at the table?
- •Holding a draw is not a reason to lead from the big blind. Both players have roughly the same draws here, so a draw is not an edge — leading with one runs into the made hands that only your opponent has.
- •Do not play top pair for three streets of value on Q-J-T. 21.0% of their range is already ahead and most of the rest is drawing at you. Calling down beats betting into it.
- •Remember what is inside that check. The big blind's 99.9% contains 32 combos of straights (K9, 98) and 27 combos of two pair. Those hands are not checking because they are weak — against the button's c-bets, passing the action back earns more than leading into it does (how often the button c-bets here is not in this study spot), and it keeps the checking range from collapsing into air. So do not read the check as nothing and rule out a check-raise. ⚠ What the frequency of that check-raise is, this solve cannot say: the study spot stops at the flop's first action, and everything past it needs "Solve this spot yourself."
- •Against opponents who never fold draws, size up rather than bet more often. Buying folds is what fails here; charging draws is what works.
Check it yourself
Open the free GTO solver, go to Study Spots → Connected Broadway, Two-Tone → [⚡ View results], and the screen above appears with no waiting.
On this spot, read the Draws panel on the right — open-enders and gutshots together clear 60%, the first time in this series. Then switch the player selector to IP (BTN) and look at Straight 10.5%: that single row is where the whole article comes from.
To drill it instead of reading it, open the GTO Trainer in the sidebar: it deals hands from the real range weights and shows how many big blinds your action costs. Free, nothing to install, no account.
Review your own hand from this spot — This spot is a BTN open, BB call pot. If you have played the same situation, open the solver's Hand review ↗, set the situation (Open · Call, BTN and BB) and Your seat, pick Your 2 cards and the 3 flop cards, then enter the actions in the order they were actually played, including your opponent's. Hand review then shows whether that choice is rated Best play, Acceptable or Review this play. Hand review uses the app's preflop charts (online 6-max cash, 100bb), so its numbers can differ from the example above, and it may not suit pub games or tournaments.